Note
My learning and exploration of these topics are heavily AI-guided and my writing and thoughts are my own. My goal with this site is to serve as a knowledge base and playbook while displaying my work and progress.
In impatience and preparation for the delivery of my newest homelab machine, I created an Ubuntu VM with UTM to install Wazuh and start getting familiar with the platform. While it was a useful experience, I no longer need UTM or the Wazuh instance installed on it because I need to run it on a machine that will be on 24/7. That machine is the Dell Optiplex 5080, which comes with:
- CPU: Intel Core i5-10500T
- Memory: 8GB DDR4 RAM (Soon to be 32GB DDR4)
- Storage: 512GB NVMe SSD
- Video: Intel UHD 630
Since Wazuh requires 8GB RAM to comfortably run for 0-25 agents, I decided to upgrade the memory capacity with 2x16GB sticks of RAM. Having the added memory will allow me to run Wazuh alongside other VMs, which I can then run Wazuh agents on to get me comfortable using the SIEM by simulating different scenarios. While waiting for the 32GB of RAM to come in, I got started with getting Proxmox installed on the Optiplex.
Before doing so, I needed to quickly confirm that an official Windows 11 Pro license was installed on this machine, as was advertised by the eBay seller I bought the machine from. Even though I am going to be replacing Windows 11 Pro with Proxmox, I still wanted to know I got what I paid for in the event that I repurpose this machine in the future. This Windows OS is tied to the motherboard, meaning that if I decide to switch to Windows later on, the license will activate on first boot. On boot, I went through the BIOS setup to enable virtualization support, set the time and date, set the AC recovery to power on (this allows the box to come back online by itself after power is cut), and disable deep sleep control in case I want to enable wake on LAN later on. After the BIOS setup was complete, I went through setup and confirmed the official OS license was there. From there I assigned the Optiplex with a fixed IP address (10.0.40.5) in the UniFi controller so I wouldn’t have to worry about it during the Proxmox install.
Flashing Promox onto a USB
In order to get Proxmox onto the Optiplex, I needed to have a USB with the hypervisor on it to boot from when I boot up the machine. To do this I downloaded the Proxmox ISO (https://www.proxmox.com/en/downloads), plugged in my USB, and flashed the ISO onto my USB stick.
Proxmox Install
At a high level, this includes:
- Target disk: 512GB NVMe, ext4 filesystem
- Country/timezone/keyboard
- Root credentials
- Network:
- Wired NIC: for me,
NIC0 (e1000e). This is the wired ethernet port. - IP:
- Static IP: 10.0.X.X/24
- Gateway: 10.0.X.X
- DNS: same as gateway
- Hostname: pve-5080.lab.local (
pve-5080becomes the node name in the Proxmox UI)
- Wired NIC: for me,
- Pin network interface names: leave checked
First Boot
Once installation is complete, you interact with Proxmox solely via the web UI at https://[IP Address]:8006. The first thing I did in the Proxmox dashboard was to disable the enterprise repo and enable the no-subcription repo. This allows me to keep Proxmox and packages up-to-date.
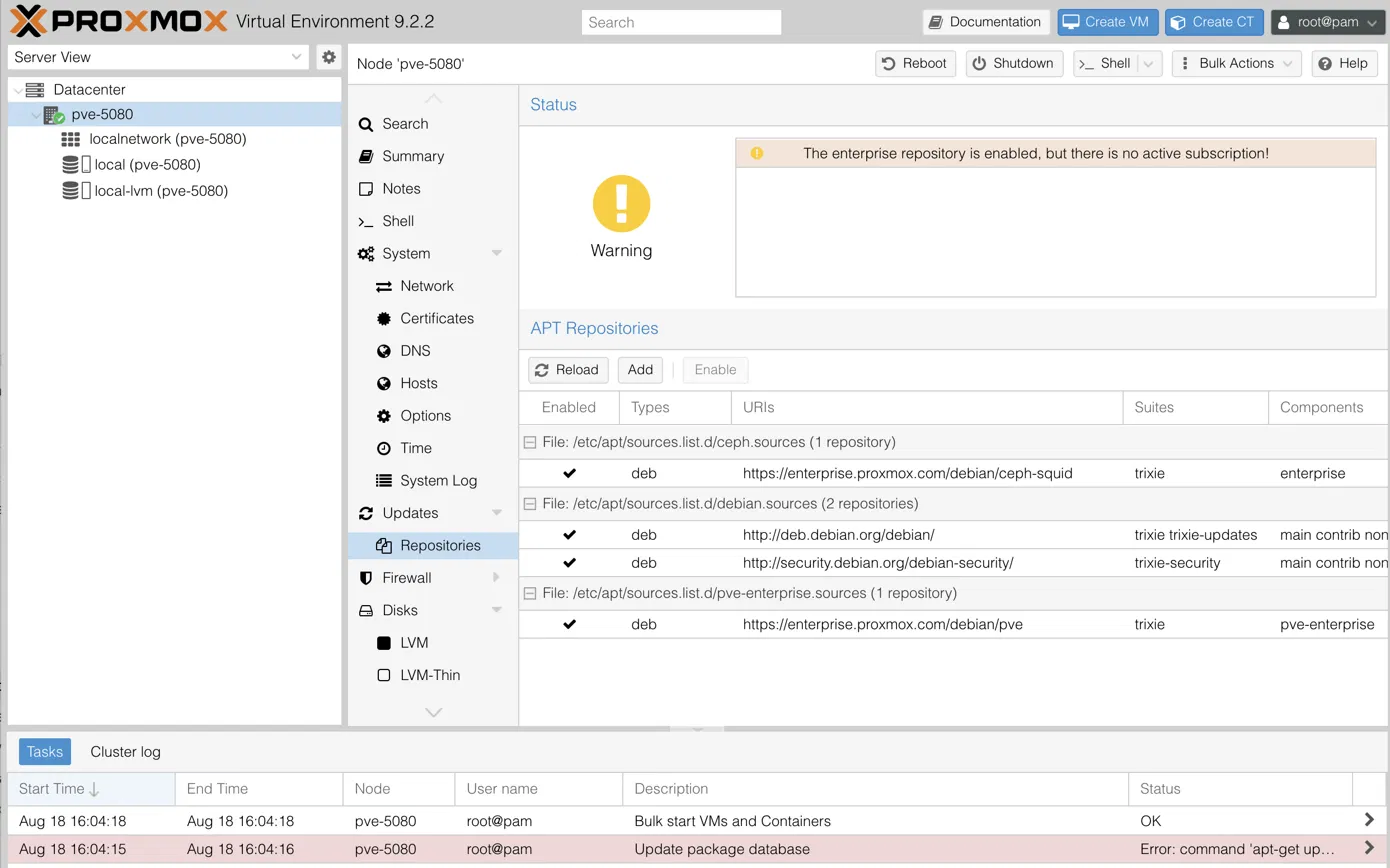
- Click the rows with
https://enterprise.proxmox.com/debian/pveandhttps://enterprise.proxmox.com/debian/ceph-squid. Click Disable for both of them. - Click Add -> No Subscription -> Add
- Reload. The two enterprise rows should now show unchecked/disabled and the
download.proxmox.comno subscription row should be checked.
Then in the sidebar click Updates -> Refresh. Once the updates finish, click Upgrade to download all the updates. Finally, click Reboot in the top right of the UI to activate the new kernel.
On to setting up the Wazuh VM.